Skip to content
Home     Guides & Resources     Case Center     How to Use Case Center Effectively During Your Appearance

How to Use Case Center Effectively During Your Appearance

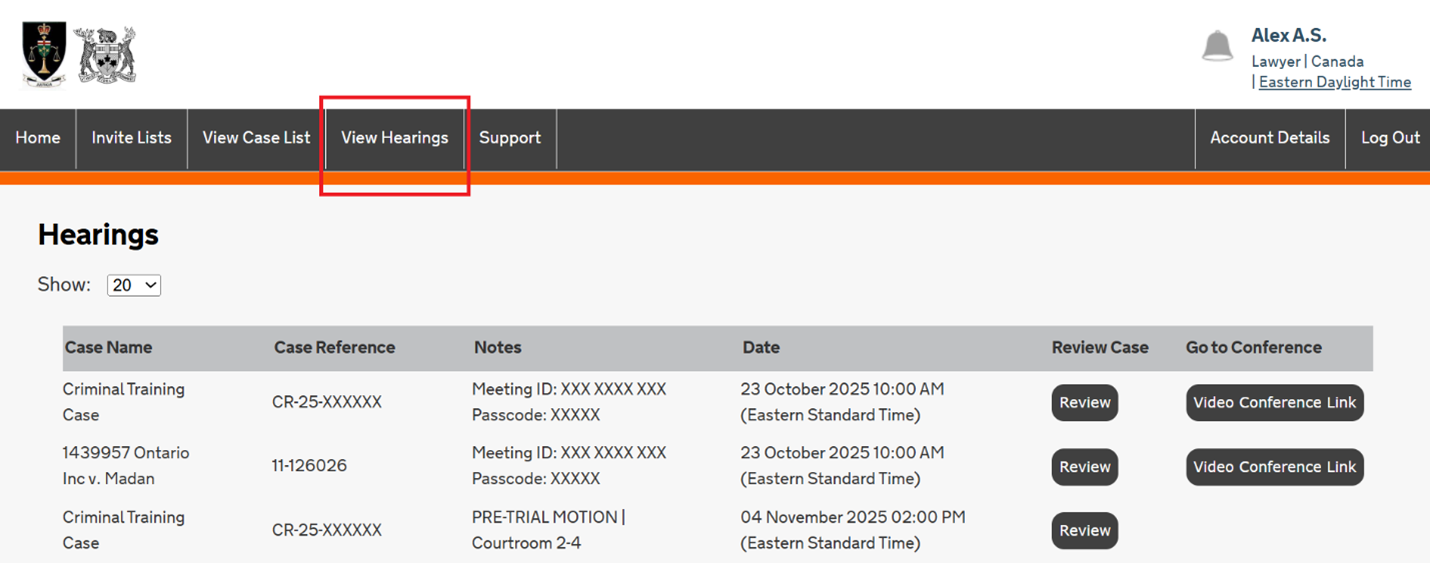
The judicial officer will only have access to the material in Case Center, so it is important that counsel and parties ensure all the material they intend to present at their hearing is accessible through Case Center. Your matter may be adjourned by the presiding judicial officer if your materials are not accessible through Case Center.

The presiding judicial officer will be able to see:

  • When parties were invited to the Case Center case;
  • When each party accessed the Case Center case; and
  • When the parties’ documents were uploaded into Case Center.

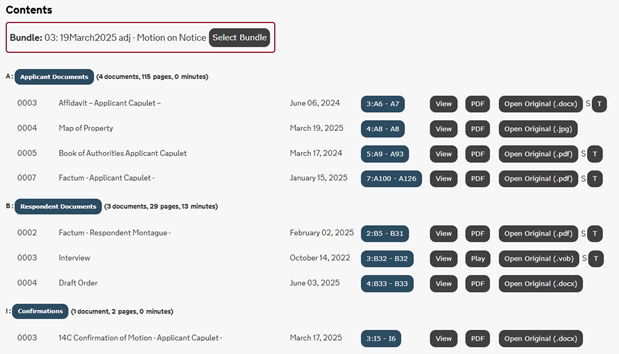
You should mark up your notes with the Case Center-generated page numbers ahead of your hearing.

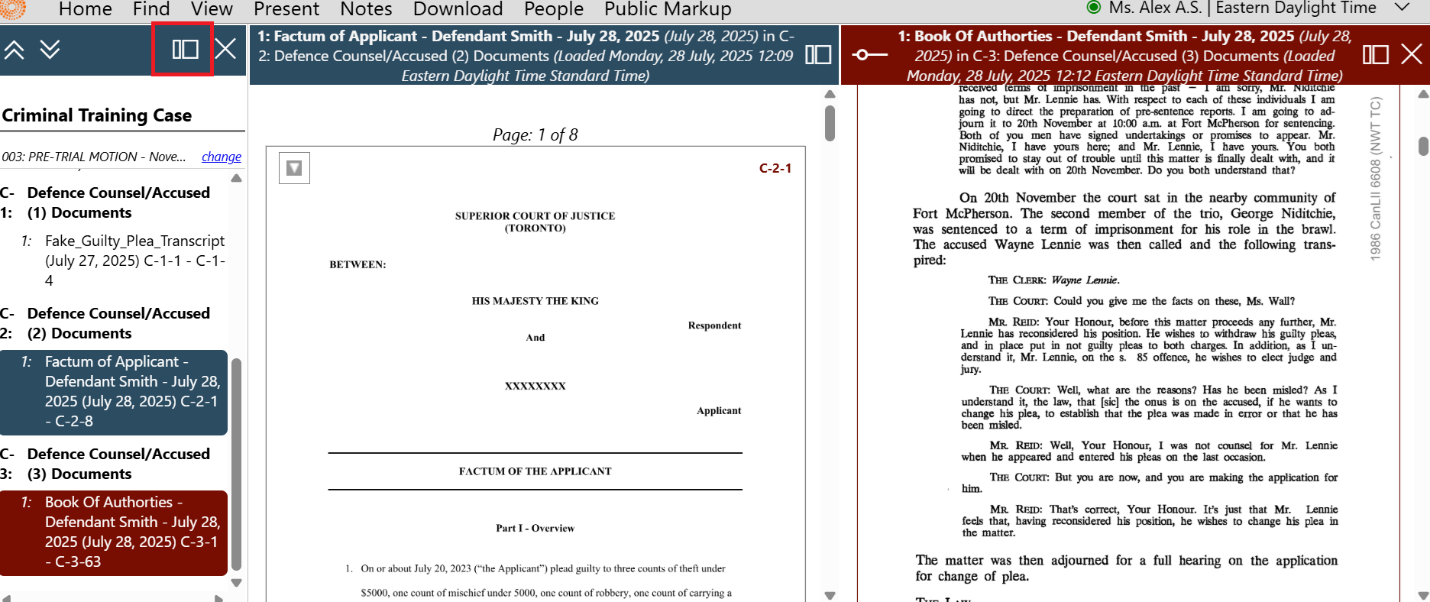
To best prepare for your hearing with Case Center, parties should:

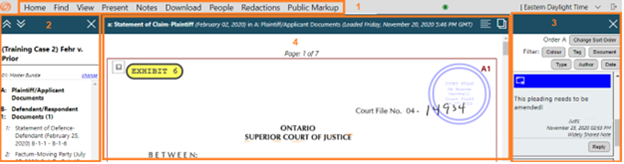
  1. Ensure hyperlinks in documents are working correctly;
  2. Ensure all materials required are uploaded; and
  3. Ensure your notes refer to the Case Center pagination.

See the “How to Organize and Upload Documents” page for more information on these topics.

During this review, parties should identify any documents that have been inappropriately uploaded by opposing parties by making a note in Case Center specifying the document(s) and why it/they should not have been uploaded. More information on using the notes function in Case Center is available below. Where a confirmation form is required for the event, any documents that have been improperly uploaded should also be noted on that form.

Below are tips to support using Case Center effectively during your appearance before the Court.

In order to properly refer to documents during your hearing, it is beneficial to know the Case Center-generated page numbers. Case Center will allow you to download an index of all documents including their system-generated page numbers so that you can keep it handy during your appearance.

To download an index of Case Center-generated page numbers:

  1. Locate the case (found on your “View Case List” screen).
  2. Select the Update Case
  3. Select Bundles.
  4. Locate the bundle you would like to reference.
  5. Select Download.
  6. Case Center will bring you to a new page with the following options:
    1. Download Complete Bundle – this will allow you to download a PDF copy of all the documents that have been uploaded into the bundle, including the Case Center-generated page numbers. This option is helpful if you would like to have a copy of the material in Case Center for use offline. This downloaded PDF will contain bookmarks in Adobe that allow you to easily access each document in a similar fashion as the Case Center “Review” screen.
    2. Download Bundle Index – this will allow you to download a PDF which identifies the title, date, and Case Center-generated page numbers for all documents that have been uploaded into the bundle. This is useful if you would like to have a quick reference point of the documents uploaded into Case Center with their system-generated page numbers when preparing for your appearance.

If your matter is proceeding virtually through Zoom, the Court will provide the virtual hearing link directly through your Case Center case.

To access the virtual hearing link for your hearing:

  1.  Locate the case (found on your “View Case List” screen).
  2. Select Update Case.
  3. Case Center will open your case on the Case Home page.
  4. Select the Video Conference Link
  5. Case Center will open a new tab on your web browser that will take you to the virtual hearing room. The Meeting ID and Passcode will also be available on this page.

Tip – You can also access virtual hearing information using the  View Hearings page from the top menu.  The “View Hearings” page is a useful tool for accessing your upcoming matters. This page will show you a list of your upcoming matters in chronological order and will include the Zoom coordinates or teleconference information for virtual hearings.

Counsel in civil, Divisional Court, and family matters can invite their client to the Case Center file. This will allow the party to access the “Video Conference Link” button on Case Center and view the uploaded documents to follow along during their hearing.

If you are counsel in a criminal matter, please be advised that accused persons, victims, witnesses, and police are not to be invited to Case Center.

To give your client access to the remote hearing without inviting them to Case Center, you can share the virtual hearing details in the following way:

  1. Locate the case (found on your “View Case List” screen).
  2. Select Update Case.
  3. Case Center will open your case on the Case Home page.
  4. Select the Video Conference Link
  5. Case Center will open a new tab in your browser for the Zoom meeting.
  6. Copy the link exactly as it appears in your browser and paste that link into your communication with your client.

This link will take your client directly to the Zoom hearing waiting room.

There are two ways to view documents that have been uploaded to Case Center: through the Case Index or through the Review screen.

The Case Index provides a list of all documents and multimedia that are available in Case Center for your matter. It is helpful to quickly access a list of the material in a case:

To access the “Case Index” page:

  1. Locate the case (found on your “View Case List” screen).
  2. Select Update Case.
  3. Select Index.


The Review screen provides the ability to navigate and view documents and multimedia files. This screen is recommended for appearances before the court, as it will allow you to move through materials easily. In the Review screen, you can also access any links within documents, play video and audio files, present materials during the hearing, and use Case Center’s advanced notetaking capabilities.

To access the “Review” screen of your case:

  1. Locate the case (found on your “View Case List” screen).
  2. Select Review.


The Review screen is split into 4 main sections:

A diagram of the review screen split in 4 sections


  1. Top menu – Provides options to search and navigate through the available material.
    • Use the Find tab to:
      • Search Case – look for a specific word or phrase in the documents.
      • Find Page – go directly to a specific page in the case using Case Center’s auto-generated page numbers).
    • Use the View tab to:
      • Zoom in or out of documents.
    • Use the Present tab to:
      • Direct others to specific areas in your material.
    • Use the Notes tab to create notes or mark up the documents.
  2. Index Menu – Displays the list of uploaded material, organized by bundle and section.
    • You can change the bundle that you are viewing by selecting the “change” button.
    • Material will be organized by section in the order you and other parties have indicated when you organized your materials.
    • You can select the bolded name of the party to expand or collapse the list of documents available in each section.
    • Selecting the “X” will hide this tab to make the document appear larger.
  3. Notes Area – provides a list of all notes you have made on a case, or that have been shared with you and other case participants.
    • Case Center has note options which include highlighting, copying text, freehand drawing, and making text notes that point to specific pages in Case Center.
    • Notes are defaulted as “private” – any notes you make will not be viewable to the judicial officer, any other parties, or staff. (Unless you write a note and select the option to make it “Widely Shared”, which will make it visible to everyone in the case).Selecting the “X” will hide this tab to make the document appear larger.
  4. Document Area – displays the uploaded documents, videos, or audio files.
    • Scroll through each document to read and review them.
    • If you click on a video or audio file, a multimedia player will appear where you can select play, pause, and control the volume.

For more information on viewing your documents in Case Center, please refer to the following video tutorial:

On the day of your appearance before the Court, you will be required to access Case Center so that you may direct the presiding judicial officer to the appropriate areas in your materials. The judicial officer will be accessing your materials through Case Center whether your matter is proceeding in person or virtually.

If your matter is proceeding in person, you may wish to register for a Guest Wi-Fi account so that you may use the courthouse’s Wi-Fi on the day of your hearing. You can register for an account here: https://forms.office.com/r/D5rVZe8d32

To easily access your Case Center case on the day of your appearance:

  1. Log into Case Center.
  2. Locate the case (found on your “View Case List” screen or through the “View Hearings” screen).
  3. Select Review. This will open a new tab on your web browser to bring you directly to the screen that displays the materials that have been uploaded to the case.
  4. If the matter is proceeding virtually, select Video Conference Link. This will open a new tab on your web browser to bring you directly into the virtual hearing waiting room.

The oral hearing is the time for parties to succinctly present their arguments. Parties must identify for the court all relevant material facts and the authorities that establish the legal proposition relied upon. It is not sufficient to merely have your filed materials uploaded to Case Center; these materials must be appropriately referenced during the hearing. Materials that are not brought to the attention of the judicial officer at the hearing may not be considered.

Staff will provide you with access to your event hearing bundle (i.e., Date – Motion) and an Orders and Endorsements bundle. If your event pertains to a family, civil or Divisional Court matter, you will also be given access to a Pleadings bundle. You will receive access to more bundles if other events are scheduled and heard through Case Center.

You can navigate through the bundles on the Review screen by selecting the “change” button underneath the case name on the left of the screen. From the popup that appears, you can select the bundle you wish to access.

To locate something specific in the materials that have been uploaded:

  • Open the “Find” tab at the top of the screen and use the Search Case
    • Enter a word or reference. Case Center show all references to that term in that current bundle.
    • You also can narrow your search to only the current document or the current section for more precise results.
    • Click the document title to go directly to the page where the term appears. The searched term will be highlighted in pale yellow for easy reference.
  • If another party is referencing a Case Center generated page number, open the “Find” tab at the top of the screen and use the Find Page
    • Enter the Case Center generated page number and press enter on your keyboard. Case Center will take you directly to that page.

Through the “Review” screen, you can direct the judicial officer and other parties to a specific page in your material during your hearing or conference. There are two ways to do this:

  1. By Page Number
    • Provide the Case Center-generated page number (e.g., B17) when referring to your material.
    • You must use the Case Center-generated page number when referring the judicial officer to your material. The judicial officer will only have access to the Case Center file and will be relying on just that page number.
  2. By Directing Others in Real Time
    • If you are using Case Center to present your argument, you have the option to immediately direct everyone to a specific page during your hearing through the system.
    • To do this, access the “Find” tab at the top of the screen and select “Direct others to Page”.
      • Before using this feature, make sure the “Lawyers, Judges, Court Staff” option is enabled (a checkmark will appear on the icon). If it is not checked, select it, then choose Direct Others to Page.
    • Using this feature will notify all participants and automatically bring them to the specific page.

You can view a short video of directing others to a page here: https://training.thomsonreuters.ca/media/1_07xhn1z9

If you have been moving between documents in Case Center and want to return to the pages you have previously viewed, click on “Find” at the top of the screen to make additional feature buttons appear.

  • Select Show the Previous Page and Case Center will return you to the page you were previously on.
  • If you have been navigating through many pages of material, you can select Viewing History to generate a popup that will allow you to see all the pages and documents you have accessed during the hearing. From this popup you can select the page you would like to return to.

There are different options to view more than one Case Center document on your screen.

To open another version of the Review screen:

  1. Select “View” at the top of the screen.
  2. Select “Open in New Tab”.
  3. This will open another tab in your browser that will allow you to view the Review screen on Case Center.

If you want to open two documents side by side on the Review screen:

  1. Select the Dual Panes Icon in the top right corner of your reading window (i.e., small overlapping rectangles):

  1. This will open a second reading pane so that you can view two documents side by side, as shown below:

  • To control which documents appear on your screen:
    1. Click on the Active Pane Icon (i.e., a bigger rectangle next to a smaller rectangle, shown above as a red box) in the top of your index header. This should change the icon so that the larger rectangle is on the right.
    2. Select another document from the index, this will now display in the right-hand reading pane.
    3. You can change the size of the way documents appear by selecting the icon that looks like a sideways lollipop:

    1. Click the Active Pane Icon again to change the selection in your left-hand reading pane.
    2. Click the “X” in the top right corner of your right-hand reading pane to return to single pane view.

Using the Dual Panes feature is also helpful if the other party wishes to direct everyone to a specific page and you want to keep your place in your material.

You can view a short video of the dual panes feature here: https://training.thomsonreuters.ca/media/1_vt90051i

Case Center has multiple features for making notes and highlights on materials. You can highlight or make notes on documents in Case Center by selecting “Notes” from the top of the screen. Case Center has the following note options:

  • Add a Case Note – this will let you add a note that applies to the whole case.
  • Add a Page Note – this will give you the option to add a note to a specific area of the document. Case Center will link that note to the specific page in the document so you can easily access that page from the Notes field. You can choose to either draw a box around the area, draw freehand around the area, or highlight text.
  • Add Pen Notes – this will give you the option to highlight, draw, strikethrough, or underline any area of the page.

Notes will be visible in the right, Notes area of the Review screen. By default, notes will be marked “Private”. This means the notes you make will only appear to you. Other participants in the hearing will be unable to see these notes, even if you are using Case Center’s “Presentation” mode.

If you are creating a Case Note or a Page Note, you will also see the option to make them a “Group” note, or “Widely Shared” note. Selecting one of these options will make the note visible to other participants with access to the case.

If you notice a document that has been inappropriately uploaded by opposing parties, apply a Case Note specifying the document and why it should not have been uploaded. Make sure to save this note as “Widely Shared” so the judicial officer can see it when reviewing the case.

You can view more information regarding notes by accessing the resources here: https://training.thomsonreuters.ca/media/1_g7fsrjo6


Other useful links: