Skip to content
Home     Guides & Resources     Case Center     How to Organize & Upload Documents

How to Organize & Upload Documents

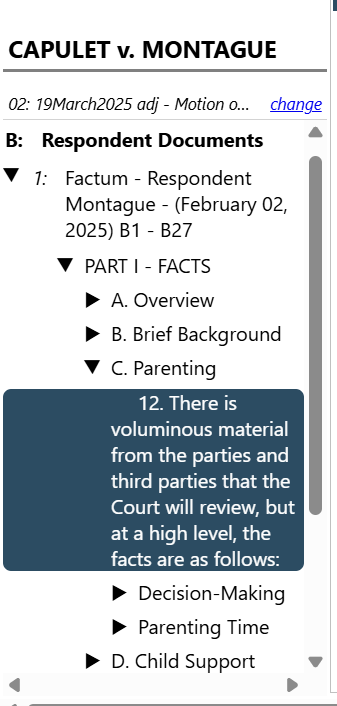
Each case in Case Center is organized into Bundles. These bundles act as a digital folder for specific hearings in the case. Counsel and parties will have access to the following bundles:

  • The hearing bundle;
  • The Orders and Endorsements bundle; and,
  • The Pleadings bundle (for Civil and Family cases only).

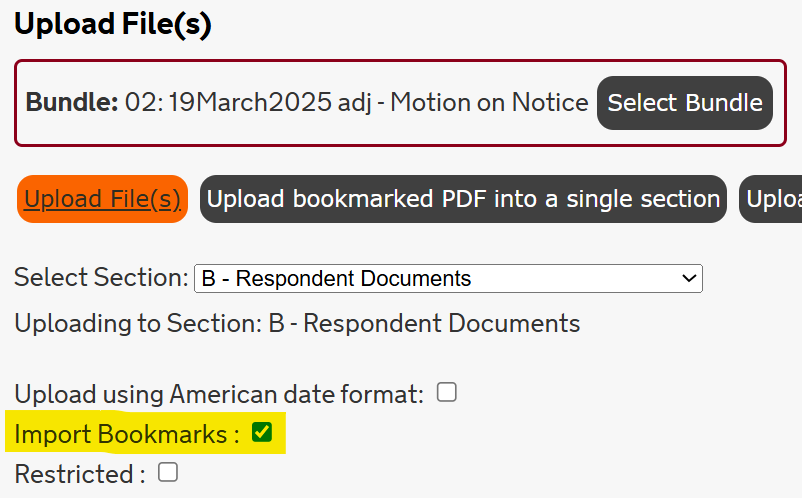
Within each bundle are Sections. These sections represent the types of documents that will be accessible within each bundle. Counsel and parties will see sections for specific party types (i.e., “Applicant”, “Provincial Crown”, “Office of the Children’s Lawyer”) and document types (i.e., “Court Order”).

Below are tips on organizing and uploading documents into Case Center.

Important!

  • In all Regions, except Toronto Region:
    • For family cases outside of the Toronto Region,Court Services will upload filed documents to Case Center on behalf of self-represented persons. To avoid duplication, self-represented persons in family cases will not be permitted to upload materials to Case Center until the trial stage of the case
    • For civil cases, outside of the Toronto Region, self-represented persons should attempt to upload documents to Case Center, where possible. Court Services will review event bundles and, where appropriate, take steps to ensure that the self-represented person’s filed materials are available in Case Center for the judicial officer presiding at the event.
  • In the Toronto Region:
    • Effective October 14, 2025, Documents accepted for filing through the Ontario Courts Public Portal in civil, family, Small Claims, and Divisional Court cases will be automatically uploaded to Case Center. Refer to the Toronto Region Consolidated Practice Direction for more information.

When a document is uploaded to Case Center, it is automatically assigned page numbers. Counsel and parties are not required to apply their own page numbering to a document.

Page numbers applied in document creating software must be placed at the top left or centre of the page. Case Center will use the top and bottom right of the page to apply its autogenerated page number, so users should not use the top or bottom right corner for their own pagination. The presiding judicial officer will rely on the Case Center-generated page numbers when reviewing and referring to a document, so it is important that these page numbers are easily visible.

Hyperlinks in documents that point to external websites will remain active after the document is uploaded to Case Center (e.g., linking a factum to caselaw on www.canlii.org). Counsel and parties can use the hyperlinking function in their document processing software. These hyperlinks will appear in Case Center with a faint purple box around the text that is hyperlinked, as seen below:

Case Center Image

Clicking on an external hyperlink in Case Center will open the link in a new tab.

Internal hyperlinks (bookmarks) pointing to a place within the same document will remain active after the document is uploaded to Case Center. For example, a table of contents in an abbreviated book of authorities can be linked to each of the authorities within. Counsel and parties can use the bookmarking function in their word processing software. These hyperlinks will also appear in Case Center with a faint purple box around the text that is bookmarked, as seen below:

Clicking on these links will navigate to the page in Case Center.

*NEW* Bookmarks in PDF documents are now retained and will be navigable in Case Center after upload. Counsel and parties must follow these steps when uploading to Case Center:

  1. Save the document using the document naming protocol as referenced in the appropriate Practice Direction as the document title.
  2. Find your case and select Update Case.
  3. Select Upload.
  4. Select the appropriate bundle.
  5. Select the appropriate section.
  6. Select the “Upload File(s)” option.
  7. Ensure “Import Bookmarks” is checked off (as shown below):

The ‘Review’ page will display these bookmarks on the lefthand navigation pane at the same level they were formatted in the PDF. Clicking on a bookmark will take the user to the relevant point in the document. Case Center will recognize and display up to four levels of bookmarks from the source PDF.


Case Center organizes documents in two ways:

  • By bundle – The hearing the document relates
  • By section – The party who filed the document or type of document.

When uploading a document, counsel and parties must:

  • Abide by page limits set out in the rules of court and relevant practice directions.
  • Name the document following the court’s document naming protocol as referenced in the appropriate Practice Direction.
  • Confirm the document is not password protected.
  • Ensure the document is under 500 pages in length. Individual documents that are longer than 500 pages may freeze while scrolling. A document longer than 500 pages should be broken down into volumes (i.e., Book of Authorities Vol. 1 — Respondent Smith — 01-JAN-2021, Book of Authorities Vol. 2 — Respondent Smith — 01-JAN-2021, etc.). Additional information on how to upload these documents  as multiple volumes is here.

Counsel and parties must not upload a document subject to a sealing order. The court’s Practice Directions have more information on how to file these materials.

To upload a document:

  1. Find the case.
  2. Select the Update Case button.
  3. Select the “Upload” button.
  4. Select “Select Bundle” and choose the appropriate bundle from the dropdown list.
  5. Select the appropriate section in the “Select Section” field.
  6. Select “Upload File(s)”.
  7. If the document is a PDF that contains bookmarks, ensure “Import Bookmarks” is checked off.
  8. To select the document:
    1. Select the document from your computer and drag it into the box; Or,
    2. Select “Add Files” and select the documents you want to add.
    3. You can add multiple documents by either selecting or dragging all the documents into the box.

Tip —You will see each of your documents listed individually. Case Center will upload the documents in the order that they appear in the list. You can change the order of the documents by using your cursor and dragging them into the correct order.

  1. Select “Start Upload“. Case Center will perform a virus scan on the document. Depending on the size of the document, it may take a moment for it to appear in Case Center.

Important! Once a document has been uploaded into Case Center, that document is before the court. Counsel and parties must not delete a document after it is uploaded to Case Center. Case Center will retain a record of documents that have been deleted, and they will appear on the “Review” page as shown below:

Counsel and parties should add a hyperlink back to the originating document for easier navigation. In the above example, a link should be created at paragraphs 178-180 of the affidavit that points back to the factum.

Counsel and parties in civil and Divisional Court cases must upload a compendium to Case Center (see the court’s Consolidated Civil Provincial Practice Direction for more information). Counsel and parties in other types of cases should consider uploading an index of the documents they will be relying on at the hearing to support the judicial officer.

To prepare an index or compendium linking directly to Case Center:

  1. Find the case
  2. Select Review.
  3. Ensure the correct bundle is If the incorrect bundle is selected, select the change button on the left-hand pane of the screen to switch bundles.
  4. All the documents in the bundle will appear on the left-hand pane of the screen. Select the document you wish to link in the compendium or index.
  5. Select View.
  6. Select Copy Link. You will see a message that Case Center has copied the link to your computer.
  7. Use your document processing software to paste the link in the index or compendium. This link will be retained when the index or compendium is uploaded to Case Center.

Documents in Case Center should be named and ordered in a way that is consistent with the court’s practice directions.

Counsel and parties can change the order documents appear and rename a document if they are the ones who have uploaded the document.

When uploading more than one document at the same time, counsel and parties can control the order those documents appear in Case Center by using their cursor to drag the documents into the appropriate order in the “Select Files” box. Case Center will upload the documents in that order.

Counsel and parties can change the order of documents after they have been uploaded by following these steps:

  1. Find the case.
  2. Select the Update Case button.
  3. Select the Sections button.
  4. Select the Update All Documents button next to the section you have uploaded the documents.
  5. Click in the Document Number field next to the document you want to change the order of and change the number. Case Center will keep the documents in sequential order based on this document number field. Make sure to keep it as a 4-digit number (i.e., 0002). There is no “save” button, clicking outside of the “Document Number” field will automatically apply your changes.

Counsel and parties can change the name of a document after it is uploaded it to Case Center by following these steps:

  1. Find the case.
  2. Select the Update Case button.
  3. Select the Sections button.
  4. Select the Update All Documents button next to the section where you have uploaded your documents.
  5. Click in the Document Title field next to the document you want to change the name of and type in the new name. There is no “save” button, clicking outside of the “Document Title” field will automatically apply your changes.Tip – If your document was not uploaded using the court’s document naming protocol, you may notice that the date in the Document Date field does not match the date the document was accepted for filing. You can type into the Document Date field to input the correct date.

Case Center supports playing videos directly through the platform. .MPG and .MP4 file extensions are the best supported video formats but other common formats are also accepted. The maximum size of a video file that Case Center will accept is 2 gigabytes.

To upload a video to Case Center:

  1. Find the case.
  2. Select the Update Case
  3. Select the “Upload” tab found in the case file.
  4. Select “Select Bundle” and choose the appropriate bundle from the dropdown list.
  5. Select the appropriate section in the “Select Section” field.
  6. Select “Upload File(s)”.
  7. You can either:
    1. Drag the video from your computer into the box. Or,
    2. Select “Add Files” and select the video you wish to upload.
    3. You can add multiple videos by selecting or dragging all the files into the box.
  8. Select “Start Upload”. Case Center will perform a virus scan on the video. Depending on the size of the file, it may take a moment for it to appear in Case Center.

Counsel and parties must submit draft orders and forms with fillable fields in accordance with the court’s Practice Directions. Counsel and parties must also upload draft orders and forms with fillable fields to Case Center in Word format (.doc or .docx).

Judicial officers can download and amend draft orders or other documents to help prepare their orders and provide appropriate authorization.

Counsel and parties must ensure “Protect Document” permissions are removed before uploading a document to Case Center.

The above does not apply to the Superior Court of Justice’s Pre-Trial Conference form for criminal matters. For information pertaining to that specific fillable form, see Criminal Judicial Pre-Trials.

Sometimes, it may be required to upload a document that is longer than 500 pages. A document longer than 500 pages can be uploaded to Case Center, with the hyperlinks retained, if it is broken down into volumes using first level bookmarks in your document processing software (i.e., Book of Authorities Vol. 1 — Respondent Smith — 01-JAN-2021, Book of Authorities Vol. 2 — Respondent Smith — 01-JAN-2021, etc.).

To upload a document longer than 500 pages:

  1. Create a bookmark or heading for each volume of your document using the document naming protocol as referenced in the appropriate Practice Direction. (E.g., Book of Authorities Vol. 1 — Respondent Smith — 01-JAN-2021, Book of Authorities Vol. 2 — Respondent Smith — 01-JAN-2021, etc.)

To apply first level bookmarks in Adobe:

    1. Select the area in the PDF file that will serve as the destination for the new bookmark.
    2. Click on the “Add Bookmark” button.
    3. The new bookmark will either be named “Untitled” or will contain the text that you selected.
    4. Ensure this bookmark is a top-level bookmark.
    5. Use “Rename Bookmark” so the title of the bookmark is consistent with the court’s naming protocol. Case Center will use the title of the bookmark as the document title after upload.

To apply Heading 1 bookmarks in MS Word:

    1. Type the name of the document using the court’s naming protocol. Case Center will use the title of the bookmark as the document title after upload.
    2. In the “Home” tab, find the “Styles” feature.
    3. Select “Heading 1”.
    4. The name of your document will be formatted as a heading. This will enable Case Center to recognize what is under the heading as a distinct document and separate it after upload. You can make the heading invisible by changing the font colour to white.
    5. You can use the “Acrobat” tab to convert your Word document into a PDF. Converting your document from Word format to a PDF will retain the first level bookmarks you applied and the links you created between documents.
  1. Find the case.
  2. Select the Update Case button.
  3. Select the “Upload” button.
  4. Select “Select Bundle” and choose the appropriate bundle from the dropdown list.
  5. Select the appropriate section in the “Select Section” field.
  6. Select “Upload bookmarked PDF into a single section”.
  7. To select the document:
    1. Select the document from your computer and drag it into the box; Or,
    2. Select “Add Files” and select the documents you want to add.
    3. You can add multiple documents by either selecting or dragging all the documents into the box.Tip —You will see each of your documents listed individually. Case Center will upload the documents in the order that they appear in the list. You can change the order of the documents by using your cursor and dragging them into the correct order.
  8. Select “Start Upload“. Case Center will perform a virus scan on the document. Depending on the size of the document and how many volumes it has been split into, it may take a moment for it to complete.

Once the document has finished uploading, each first level bookmark will appear as a separate document in Case Center, but hyperlinks in the separated document will still work since they were uploaded as one document.


Other useful links: